Showing posts with label Breakfast. Show all posts

Saturday, January 12, 2013

Home Fries


Home Fries, or sometimes they're called hash browns, are ridiculously easy to make and are so homey and delicious.  They are good for breakfast or dinner, with pancakes or pork chops.  They're really just potatoes that are pre-cooked, then seasoned and browned.  Easy-peasy, and sure to please everyone!

Home Fries

Ingredients:
3 large baking potatoes (Russets are the best!)
1 Tbs butter
1 Tbs vegetable oil
Salt and pepper, to taste

Wash potatoes and stab a few times with the tines of a fork.  Place in a microwave oven and cook on high for 12-15 minutes, or until potatoes feel tender when you squeeze them (use a hotpad!).  Alternatively, you could use leftover baked potatoes.  Remove potatoes from microwave and carefully slice the skins off using a paring knife.  Discard skins, then cut potatoes into 1/2" cubes.

Combine butter and oil in a large skillet over medium-high heat.  Add potatoes and sprinkle with salt and pepper to taste.  Stir potatoes carefully with spatula to coat all sides in butter/oil mixture.  Let brown, stirring every 3-4 minutes, until potatoes are slightly crisp and browned on all sides, about 15 minutes total.  Serve immediately.

Makes 4 side-dish servings.

Thursday, October 18, 2012

Carve-Your-Own Jack-o-lantern Pancakes


We're a big pancake family; we eat them at least twice a week, and often four or five times.  Generally I stick to the round variety, but during holidays it's fun to shake it up a bit.  This week we had Carve-Your-Own Jack-o-lantern Pumcakes.  Or Pancakes.  Whatever.


Each person got one pumpkin-shaped pancake, and then carved a face in it before eating.  It doesn't sound like much, but the kids were crazy about it, and it's certainly easier than carving an actual pumpkin!

Here's my pancake recipe: Buttermilk Pancakes

Then you just have to dye a little bit of the batter green (no more than 1/2 cup), and the rest orange, and make some nice pumpkin shapes.

Serve them up nice and hot, and go at the carving!


Sunday, August 19, 2012

Crepes

I love crepes.  Since I was a child they had this aura of being exotic and rich and special and, above all, delicious.  When we went to places like IHOP (which was a rarity for my family), I always checked to see if they had crepes. 

When I was 15 I flew to Paris to spend a month with my sister, who was there doing a semester abroad.  The two of us often stopped to buy an enormous crepe from the sidewalk vendors. I was fascinated with watching them pour the batter out of the ladle onto the huge spinning skillet, flipping it with skill, and then deftly folding it into quarters, sprinkling it with powdered sugar and lemon juice, and plating it up.  My mouth still waters when thinking about them.

So you can imagine my delight when I married into a family that made crepes for lots of special occasions.  My mother-in-law patiently taught me the tricks of getting the batter evenly distributed around the pan, how to turn them without tearing them, and the best fillings and toppings.  Now I'm a pro (or so I think, though hers are still thinner than mine!) and we make them on special occasions at my home, or sometimes just on a random Sunday morning. 

They still make my mouth water.

Crepes
Recipe by Ruth Beal

Ingredients:
1 cup flour
2 cups milk
1/4 tsp salt
1/2 tsp grated lemon zest
2 T sugar
3 eggs

In a mixing bowl combine flour, milk and salt with a whisk.  Add the lemon zest, sugar, and eggs and beat well.  Set aside for 10-15 minutes.

You'll need something to grease your pan with.  My mother-in-law using shortening, but I use cooking spray.  I think it's easier and you get more consistent results.  But you use whatever you'd like. 

I use an 8-inch skillet, though you could use one larger, you would just have to pour in more batter.

Heat your pan over medium to medium-high heat (my stove works best when set at number 6 out of 10).  When it's hot, grease it lightly, then take 1/4 cup of batter (or more if you're using a larger pan) and pour it quickly into the pan WHILE tipping the pan in a circular manner to let the batter evenly coat the pan.  This is really the trickiest part of the whole enterprise and mostly requires practice, so don't give up if you don't do it right the first (or fourth) time around.  They still taste good regardless of how they look.

You'll notice that the edges (which are generally thinner) will start to brown and crisp up before the rest. 

Once you notice them browning a bit, run around the entire edge with a thin pancake turner or spatula.  I've found that I like plastic ones better than metal because they slide easier without breaking the crepe. 

After loosening the edges, I usually grab one bit of the edge with my finger and start to lift the crepe up, while sliding the pancake turner underneath.  Then you just lift up carefully and flip the crepe over. 

It only needs to cook a little while on the second side, and then place it on a plate.  Regrease the pan and begin again!


Makes about 15 crepes.

We eat these with fruit, jam, Nutella, yogurt, syrup, powdered sugar, cinnamon sugar, or anything else that seems good at the time.  My husband's family spreads the following mixture on the crepes, then rolls them up and tops with a fruit compote or jam:

Cream Cheese Filling:
1 package cream cheese
2 Tbs sugar
2 Tbs milk
A squeeze of lemon juice and zest

Beat the above with a mixer until light and fluffy. 

Wednesday, July 18, 2012

Spoon Bread


I have to admit that I had never heard of spoon bread before making this recipe.  Apparently it's quite popular in the Southern US, and is served alongside meats for lunch or dinner, or with syrup for breakfast.  It's not a bread in the traditional sense, more like a cross between cornbread and a souffle.  It's quite delicious, and although this is the first recipe for it I've tried, I'm willing to bet that it's one of the better ones just because it comes from America's Test Kitchen.  I can imagine that it would be fantastic with a Pot Roast, or with Pulled Pork or BBQ Chicken.  Anything that has a bit of sauce or juices to soak up would be good.  Try it out.  And to my Southern friends, what do YOU serve spoon bread with? Leave a comment and let me know, because I want to make it again!

Spoon Bread
Recipe by America's Test Kitchen

Ingredients:
3 cups half-and-half (no substitutions, or the texture and volume with suffer!)
1 tsp salt
1 cup white or yellow cornmeal (fine-ground is better if you have it)
2 Tbs butter
3 large eggs, at room temperature, separated
1-2 tsp water

Heat oven to 350F.  Butter or grease a 1 1/2 quart souffle dish, or an 8-inch high-sided cast iron skillet.

Bring half-and-half and salt to a simmer in a large heavy saucepan.  Reduce heat to low, then slowly whisk in the cornmeal.  Don't stop whisking or you'll end up with lumps.  Once cornmeal is all added, continue whisking for another 2 minutes or so, until it thickens and develops a satin sheen.  Turn off the heat and stir in the butter.  Set aside.

In a small bowl whisk together egg yolks and 1-2 tsp water until lemon-colored and very frothy, about 2 minutes.  Stir them into the slightly cooled mush, a little at a time so the yolks don't set.  In a separate bowl, beat the egg whites on high until they just form stiff peaks, but they still look wet.  Gently fold them into the mush.

Pour the mixture (or spread--it's rather thick) into the greased souffle dish.  Bake until the spoon bread is golden brown and has risen about the rim of the dish, about 45 minutes.  Serve immediately.  If you don't serve immediately, it will fall a bit, but will still taste delicious.  You can refrigerate leftovers and eat them with syrup for breakfast. 

You can also add in 1/2 cup grated cheese along with the butter if you'd like a cheesy variation.

Serves 6-8.

Wednesday, March 28, 2012

Portuguese Sweet French Toast

I've been debating with myself about posting this recipe.  Not because it's bad--in fact it's the best French Toast I've ever had, which is why in the end I decided to post it.  But in order to make it, you'll need to have Portuguese Sweetbread, which is not particularly accessible to most people.  Portuguese Sweetbread (see picture below) is a round artisan-style bread, with a very deep brown, soft crust and a whitish-yellow interior.  The texture is soft and spongy, and the flavor is sweet, with hints of lemon and orange and vanilla.  It's amazing.  And not just for French Toast--also for things like paninis with ham and swiss cheese. 
Portuguese Sweetbread

So check your local bakery to see if they have it.  If not, then here's what you'll need to do:

Step One: Go to your local bookstore or library and get the book "The Bread Baker's Apprentice," by Peter Reinhart.  Spend a day or three reading through it, because even though it's a cookbook, it's an amazing read.  Or maybe just to me.  Anyway...

Step Two: Starting early in the morning, make Peter's recipe for Portuguese Sweetbread, following the directions explicitly. Do not, under any circumstances, get annoyed that your bread is not rising as quickly as it should and therefore just move on to the next step.  Trust me on this one.

Step Three: Go to bed.  Making Portuguese Sweetbread takes a full day. 

Step Four: In the morning, slice nice thick slices of the bread, around 3/4"-1" thick.  Make the recipe below.

Step Five: Eat, then die.  There is nothing more you can do with life after this.

Portuguese Sweet French Toast

Ingredients:
4-5 slices Portuguese Sweetbread, cut 3/4-1" thick
2 eggs
1/4 cup milk
1/2 tsp cinnamon
1/4 tsp cloves
1/4 tsp nutmeg
1/8 tsp cardamom
Vegetable oil, or even better--leftover bacon grease, for frying
Butter, for slathering
Pure Maple Syrup, warmed

Heat a griddle or frying pan over medium heat.  In a shallow bowl or pie plate whisk the eggs, milk, cinnamon, cloves, nutmeg, and cardamom until frothy and well-combined.  Place bread in egg mixture and let sit to absorb the liquid for about 30 seconds before flipping to the other side and doing the same thing.  Meanwhile, grease the griddle with oil or bacon fat.  Place the soaked bread on the griddle and put in another one to soak.  Cook for about 2 minutes per side, until the bread is soft and spongy again and is nicely browned. 

Remove from heat and put on serving plate.  Immediately butter the top side of the french toast.  Pour real maple syrup and serve.  Enjoy!

Serves 2, in case you want to share.

Wednesday, March 21, 2012

Blueberry Scones


 So a few weeks ago I posted the recipe for scones, and said that I had already posted the recipe for my blueberry scones.  This week I looked and noticed that the blueberry scone recipe is not here!  Something I have to amend immediately!

This recipe is from America's Test Kitchen and is absolutely amazing.  Also, they use a great technique for cutting in butter that both saves time and improves texture, and I've applied it to lots of other recipes since then. 

These scones are buttery and flaky and sweet and oh-so-good.  I'm drooling just thinking about them.  If you, like my ridiculous children, prefer them plain you can make them that way, but they're really better with some berries.  I've also made them with blackberries and raspberries with great success. 

Blueberry Scones
Adapted from America's Test Kitchen


Ingredients:
8 T (1 stick) butter, very cold (frozen is good)
1 1/2 cups blueberries, either fresh or frozen
1/2 cup whole milk
1/2 cup sour cream or plain yogurt
2 cups flour, plus more for work surface
1/2 cup sugar
2 tsp baking powder
1/4 tsp baking soda
1/2 tsp table salt
1 tsp grated citrus zest, either lemon, lime, or orange (or a combination)
2 T melted butter
1 T sugar

If using fresh blueberries, check them over for stems, etc., then put them in the freezer until ready to use.

Using a box grater, grate the cold/frozen butter into a bowl.  Place in freezer until ready to use.

In a small bowl, whisk together the milk and sour cream/yogurt.  Place in refrigerator until ready to use.

Preheat oven to 425F.  Line a baking sheet with parchment or silpat, or lightly grease.

In a large bowl, combine flour, 1/2 cup sugar, baking powder, baking soda, salt, and zest with a whisk.  Add frozen butter to the bowl and toss with fingers until thoroughly coated.  Add milk mixture to flour mixture, combining with a spatula until just combined.  Dough will be loose and may not have fully come together.  This is fine.

Transfer dough to a liberally floured surface.  Knead a few times until the dough comes together and isn't so sticky.  You may use another 1/2-1 cup flour at this time, which is fine.  Roll dough into a 12-inch square.  Fold down the top third of the dough, then fold up the bottom third, so the dough is folded like a business letter.  Then do the same thing with the sides of the dough, so you have a 4-inch cube.  Transfer dough to a floured plate and freeze for 5 minutes.

Transfer cold dough to floured work surface and again roll into a 12-inch square.  Sprinkle blueberries over the surface, pressing them slightly into the dough.  Using a bench scraper or thin metal spatula, loosen dough and roll up cinnamon-roll style into a tight log.  Lay roll seam-side down and squash the top with your hands to make it rectangular instead of round.  Cut into 4 equal squares, then cross-cut each square into two triangles.  (I frequently cut the big log into 5 instead of 4, and it works fine, it just makes smaller scones.)

Place the triangles on prepared baking sheet.  Brush tops with melted butter and sprinkle with sugar.***  Bake at 425F for 18-25 minutes, until tops and bottoms are browned.  Transfer to rack and let cool 10 minutes before serving.

Makes 8-10 scones.

***You can also refrigerate or freeze these at this point.  Put the entire baking sheet in the refrigerator or freezer.  After refrigerating overnight, follow the same baking directions as above.  For frozen scones, heat oven to 375 and bake for 25-30 minutes.

Even bedhead is better when you're eating a scone.


Monday, February 27, 2012

Buttery Scones


I love scones.  I have already posted my favorite blueberry scone recipe, and this one is similar, but without the berries.  Half my kids don't like blueberries, so I have to make plain scones for them sometimes, too.  We like to eat them with jam. 

Buttery Scones
Recipe adapted from Good Housekeeping


Ingredients:
3 1/3 cup flour
1/2 cup sugar
2 T baking powder
1/2 tsp salt
6 T cold butter
1 cup whole milk
2 large eggs, beaten
1 T whole milk
1 T sugar

Preheat oven to 400F. Grease a cookie sheet.
Using a box grater, grate the butter.  Put in freezer until ready to use.
In a large bowl, mix flour, 1/2 cup sugar, baking powder, and salt.  Add in grated butter and mix lightly with your hands until butter is evenly distributed. 
In a small bowl, combine 1 cup milk and eggs. Make a well in the center of the flour mixture and pour in milk mixture.  Stir until just combined.
Turn dough onto prepared cookie sheet (dough will be sticky).  Using floured hands, pat dough into a 9-inch circle.  Brush 1 T milk over the surface of the dough, and sprinkle with remaining 1 T sugar.  With floured knife, cut into 8 wedges, but do not separate.
Bake at 400F for 15-20 minutes, or until golden brown.  Let cool 5 minutes or completely before serving. 
Makes 8 large scones.

Wednesday, February 15, 2012

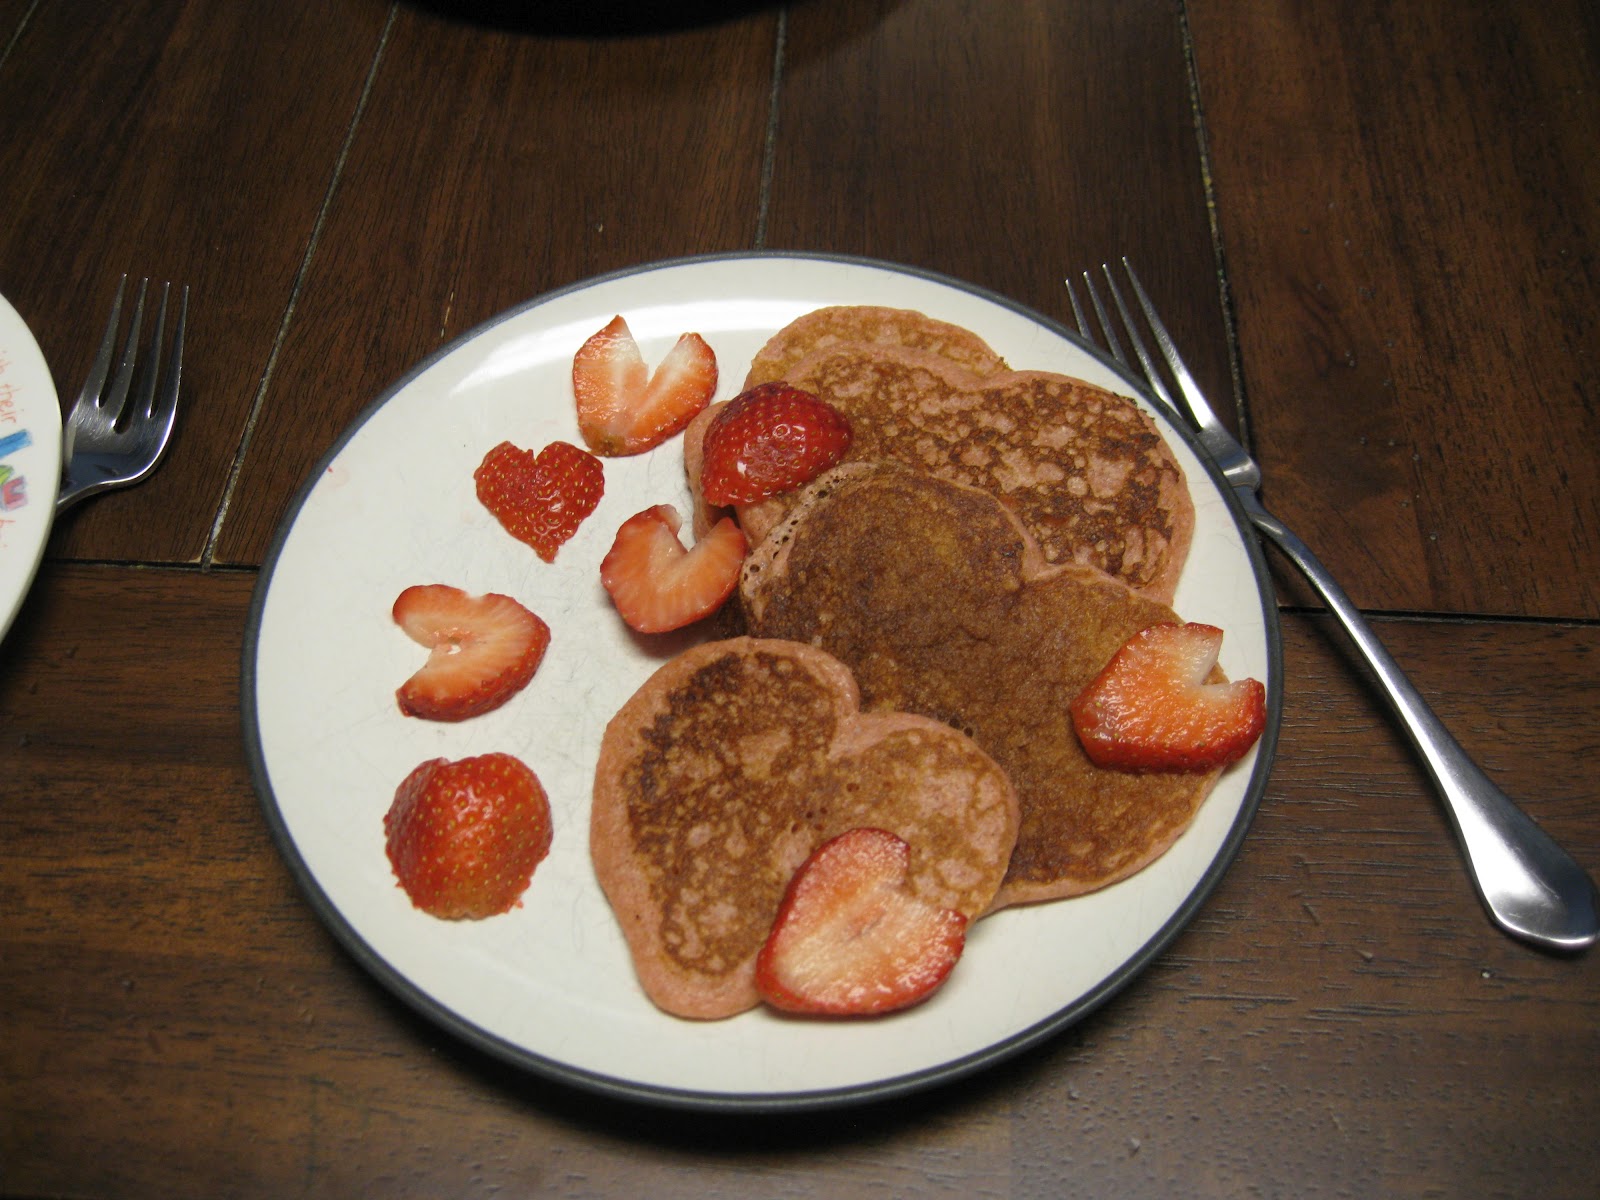
Valentine's Day Pancakes

Look at the sweet pancakes my fantastic husband made for Valentine's Day!  Isn't he great?


If you'd like my great pancake recipe (minus the food coloring!), it's here:

Buttermilk Pancakes

Ingredients:
1 cup flour
2 T sugar
1 tsp baking powder
1/2 tsp baking soda
1/2 tsp salt
3 T butter, melted
1 egg, lightly beaten
1 1/4 cup buttermilk (NO SUBSTITUTIONS)

In a medium mixing bowl, combine all the dry ingredients.  Add the wet ingredients and mix until combined (may be slightly lumpy).  Heat your griddle over medium heat until water drops dance on top.  Use about 1/4 cup of batter for each pancake.  Cook until edges are dull and a few bubbles have popped on the surface of the pancake, then flip and cook 30 seconds on the other side.  Serve hot.
Makes about 12 pancakes.

Friday, January 27, 2012

Æbelskiver


I have to begin this post by saying that my mother-in-law is Danish.  This recipe for Æbelskiver (pronounced "able-skeever") is her recipe.  Æbelskiver are a traditional Danish breakfast food, usually made on special occasions.  They are essentially pancakes, but in the shape of a ball.  They have to be cooked in a special pan, which you can currently purchase at Williams-Sonoma, and which looks like this:

These are so delicious.  They are like pancakes, and yet are different somehow.  Plus, the whole fact that they are shaped like a ball makes them fun.  You can also put things inside of them while cooking.  Æbleskiver actually translates as "apple slice," because traditionally a small piece of apple would be placed in the middle during baking.  I've tried that, as well as pear, raspberry, blueberry, and blackberry.  All of them are fantastic.  Williams-Sonoma touts filling them with jam or even decadent chocolate fillings while baking.  My mother-in-law dismisses this as foolishness, and says it is very NOT Danish. We generally break them open after cooking, and put a little jam in the middle.  My kids dip them in maple syrup.  But any way you eat them, they're delicious.

Æbelskiver

Ingredients:
2 cups flour
1 1/2 tsp baking powder
1/2 tsp baking soda
1/2 tsp salt
1/4 tsp cardamom (optional, but very good)
Zest from one lemon (again optional, but very good.  I've also used lime and orange zest.)
2 cups buttermilk (no substitutions!)
4 eggs
1/2 cup (1 stick) butter, melted

In a medium bowl, combine flour, baking powder, baking soda, salt, cardamom, and lemon zest.  Add buttermilk and mix to form a thick batter, then mix in eggs and finally butter.  Transfer to a pitcher and let sit for 5 minutes while you heat up the pan.
Heat Æbelskiver pan over medium heat.  Spray the pan with cooking spray, being sure that each well is coated.  Pour batter into each well, coming within 1/4" of the top of the well, but not filling it up completely.  Let cook for 1-2 minutes, or until you can see the outside edges setting up, and the middles getting puffy.  Using a wooden skewer or a fork, grab the outside rim of each Æbelskiver and quickly pull it to the other side, turning it over.  This is how the ball is formed.  Let cook an additional 1-2 minutes, or until the Æbelskiver is browned and the inside is cooked through.  Remove from pan, respray with cooking spray, and pour in more batter.  Repeat until no batter remains.
Makes about 40 Æbelskiver, which serves about 6 people.

Friday, January 20, 2012

Crispy French Toast Dippers


These little beauties answer the question, "What am I going to do with that whole box of cornflakes?" I only ever buy cornflakes for recipes, and after buying them for the chicken on Wednesday I needed something else to do with them (because eating them as a breakfast cereal is obviously out of the question--I mean really, who does that?).  So here is the answer.

Seriously though, these little beauties (also from the Comfort Foods Fix cookbook) are crunchy on the outside and soft and tender on the inside.  They're perfect for a relaxed morning or a holiday breakfast.  And what kid doesn't love to dip?  Serve with a little bowl of syrup or thinned-out jam, and everyone will be begging for more.

Crispy French Toast Dippers
Recipe by Ellie Krieger

Ingredients:
1 cup sliced almonds
3 cups cornflakes
1/2 tsp ground cinnamon
1/2 tsp ground nutmeg
1/4 tsp salt
2 large eggs
3/4 cup milk
1 T maple syrup
1 tsp vanilla extract
4 large slices firm whole-grain bread, each piece cut crosswise to make 4 or 5 fingers
Cooking spray

In a food processor or blender, pulse the almonds until coarsely ground.  Add the cornflakes, cinnamon, nutmeg, and salt and pulse until cornflakes resemble the texture of oats.  Transfer mixture to a shallow dish.
In a separate bowl whisk together eggs, milk, syrup, and vanilla until well combined.
Spray a large nonstick skillet or griddle with cooking spray and preheat over medium heat.  Dip each piece into the egg mixture, allowing the bread to become completely moistened but not soggy.  Then transfer to the cornflake mixture and coat each side completely.  Cook on the skillet over medium-low heat (not any higher or they'll burn), turning once, until the outside is golden brown and the center is warm, about 6 minutes total.
Makes 4 servings.

Saturday, January 14, 2012

Freezer Jam


I love jam.  I could eat it on anything.  There is nothing better in this world than warm homemade bread slathered with butter and jam.  We go through jam pretty quickly around here, so I'm constantly making freezer jam.  The benefit to freezer jam versus traditional jam is that you don't have to cook it and seal it.  It's very simple and quick.  I use whatever fruit is in season that I can buy cheaply, or in winter I buy bags of frozen berries and use those.  You can put the jam into jars, as is tradition, or you can use Tupperware-type containers (which stack nicely in the freezer).  I used to use the small 1/2 cup jars, but now I've moved to the large 2 cup jars, since we can finish off a 1/2 cup jar in one sitting. 

Once you get the basic recipe down, you can play around with it a bit.  For instance, use lime or orange juice instead of lemon.  Add cinnamon or ginger.  Combine different fruits.  Have fun, try new things, enjoy yourself.  It's jam--what could go wrong? Here are two different recipes, one using pectin, one using modified food starch.  Pectin is traditional and will produce a slightly looser jam.  The starch jam will produce a more jelly-like texture, though not as set.

Always Perfect Freezer Jam (using pectin)

Ingredients:
4 cups fruit, such as berries, peaches, plums, etc.  Skin/pits should be removed and large fruit should be cut into 1/2" chunks.
4 cups sugar
1 T lemon juice
1 package fruit pectin, such as Sure Jell
3/4 cup water

In a large bowl, crush the fruit with a potato masher.  It shouldn't be perfect, a few lumps are desirable.  Add lemon juice and sugar and stir to combine.  Let sit so the sugar can begin to dissolve.  Meanwhile, combine pectin and water in a small saucepan.  Cook over high heat until it begins to boil.  Boil for one minute, then stir immediately into fruit mixture.  Stir for five minutes, or until sugar dissolves completely and jam begins to thicken.  Ladle into containers, top with lids, and let sit out for a couple of hours.  Freeze for up to one year, or refrigerate for up to 3 months.

Less Sugar Freezer Jam (using Modified Food Starch)

Ingredients:
4 cups fruit, such as berries, peaches, plums, etc.  Skin/pits should be removed and large fruit should be cut into 1/2" chunks.
2 cups sugar
1 T lemon juice
1/2 cup modified food starch, such as Instant Clear Gel or Ultra Gel

In a large bowl, crush the fruit with a potato masher.  It shouldn't be perfect, a few lumps are desirable.  Add lemon juice and sugar and stir to combine. Slowly stir in the starch, then continue to stir for five whole minutes, until jam begins to thicken and sugar dissolves.  Ladle into containers, top with lids, and freeze or refrigerate until needed.  Can be frozen for up to one year, or refrigerated for up to 3 months.

Saturday, July 3, 2010

Patriotic Pancakes

Why not spice up your 4th of July breakfast with these Patriotic Pancakes? They do take slightly longer than regular pancakes to make, but the results are worth it! 

Start with my basic Buttermilk Pancake recipe (I doubled it this time).

Buttermilk Pancakes

Ingredients:
1 cup flour
2 T sugar
1 tsp baking powder
1/2 tsp baking soda
1/2 tsp salt
3 T butter, melted
1 egg, lightly beaten
1 1/4 cup buttermilk

In a medium mixing bowl, combine all the dry ingredients.  Add the wet ingredients and mix until combined (may be slightly lumpy).  Heat your griddle over medium heat until water drops dance on top.  Use about 1/4 cup of batter for each pancake.  Cook until edges are dull and a few bubbles have popped on the surface of the pancake, then flip and cook 30 seconds on the other side.  Serve hot.
Makes about 12 pancakes.

For the Patriotic version, divide the batter into three bowls.  Using food coloring, dye one bowl red and one blue; leave the third bowl white.  There are a few different styles of pancakes that I made using the three colors:

Red, White, and Blue stripes:
Using a spoon (I used a regular spoon like you would use to eat cereal or ice cream with), make a red spot, a white spot, and a blue spot, all touching.  Bake like normal. This makes a pancake that is oval in shape and has a red stripe, a white stripe, and a blue stripe.  It's the easiest to make by far.

Red, White, or Blue Stars:
Spray non-stick spray (like Pam) on the inside edges of a star-shaped cookie cutter.  Place the cookie cutter on your hot griddle. Pour one spoonful of batter (pick a color) into the cutter.  Let it sit until set, then carefully slide your pancake-turner under the cutter, grab the cutter with your fingers or tongs (it will probably be hot), and flip it over.  If you've greased it well the pancake inside should slip down to the griddle.  Cook until set, then remove to a plate and take off the cutter.  You can gently push the pancake out if it sticks a little.  Re-grease the cutter and do it again.  When it's done baking you can just eat with syrup or you can decorate with berries, like so.
Flag Pancake:
To make the flag pancake, start with the blue blob for the starry field.  Then make a red stripe at the top to the right of the blue (I found that the longer and thinner you make it, the better it looks when cooked).  Make a white stripe under the red, then a red and then another white if you have room.  Be very careful when flipping this--make sure it's pretty set so it doesn't run everywhere and mix your colors.  You can decorate it with berries and powdered sugar (or whipped cream) or just eat it with syrup.
Happy American kids love patriotic pancakes!

Saturday, February 20, 2010

Berry Good Muffins

We love muffins around here; actually we love all breakfast foods!  This recipe came on the underside of the lid of Stonyfield Farms yogurt, and I still have the lid (and recipe) today, almost 1 1/2 years later.  I like it because it includes whole wheat flour, but mostly because it's delicious!  The original recipe calls for strawberries, but we use whatever berries we have available (usually frozen blueberries).  They're so good that they were gone this morning before I could take a picture. Enjoy!

Berry Good Muffins

Ingredients:
1 cup white flour
1 cup wheat flour
1/2 cup sugar
1 1/2 tsp baking soda
2 eggs
1 cup yogurt (I recommend plain or vanilla, but I've also used berry, lemon, and even key lime in a pinch!)
1/4 cup butter, melted and let sit until room temperature
1 tsp vanilla
1 1/2 cups berries (if they're big ones,  you'll want to chop them up a bit)

Preheat oven to 375F and grease a 12-muffin tin.  In a large bowl, stir together flour, sugar, and baking soda.  In another bowl, stir together eggs, yogurt, butter, and vanilla.  Toss the berries with the flour mixture before adding the wet ingredients.  Mix everything together until moistened.  Spoon the batter into the muffin tin.  Bake for 20-25 minutes, until golden brown. 
Makes 12 muffins.